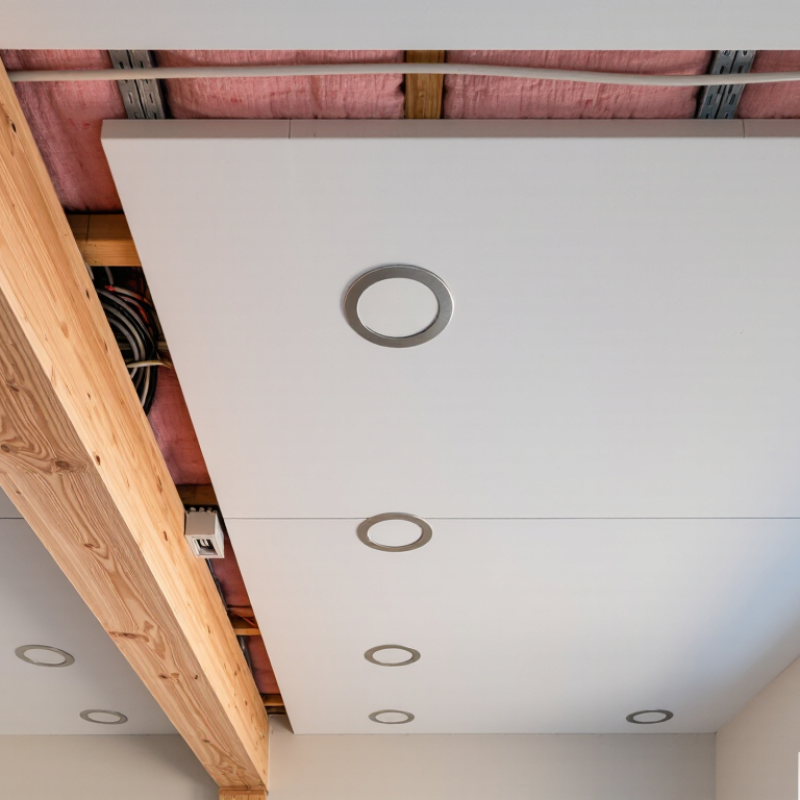
Why Can Slim Lights Be Installed Under Ceiling Joists?

Time:2026-10-07 Author:Ethan
0%

When planning recessed lighting, many homeowners wonder, “can slim lights be installed directly under a ceiling joist?” The answer depends on the fixture design, installation method, and ceiling structure. Slim lights usually have shallow housings, so they can fit where traditional recessed cans cannot. However, “slim” does not mean universally safe or suitable. The product manual remains the most reliable starting point.

A properly selected wafer light may sit beneath a joist because its junction box and LED panel need limited depth. Some models attach to the ceiling surface, while others require a small opening between framing members. Check the fixture’s insulation-contact rating, heat protection, driver location, and required clearances. These details matter above a drywall ceiling, where insulation can surround the light and trap heat. It is also important to avoid drilling, cutting, or weakening a joist without professional guidance. A joist may look simple from below, but it carries loads that are not always visible.

Think about the real ceiling, not only the product photo. A crowded attic, old wiring, or uneven framing can change the installation plan. In my experience, marking the joist with a stud finder and confirming the wiring path prevents expensive surprises. Still, tools are not perfect. A qualified electrician should verify connections, grounding, and local installation requirements. Manufacturer instructions should control the final decision. This article explains why some slim lights work under ceiling joists, where limitations appear, and which checks help create a safer, cleaner installation. Planning carefully is worth the extra minute.

Why Can Slim Lights Be Installed Under Ceiling Joists?

What Slim Lights Are and How They Differ from Standard Fixtures

Why Can Slim Lights Be Installed Under Ceiling Joists?

What Slim Lights Are and How They Differ from Standard Fixtures

Slim lights are shallow LED fixtures designed for tight ceiling spaces. Many measure less than 30 millimeters in visible depth. Standard recessed fixtures often need a deeper housing between joists. That housing can conflict with timber, ductwork, insulation, or plumbing above the ceiling.

The difference is practical. A slim light usually separates the visible panel from its remote driver or junction box. The panel sits close to the ceiling surface, while the electrical box fits through a small opening. This design allows installation between joists or directly beneath them, when the fixture is approved for that method. It does not mean every slim light can touch wood. Always check the installation instructions, insulation rating, and local electrical requirements.

The energy case is also significant. The International Energy Agency estimates that lighting represents about 15% of global electricity consumption. The U.S. Department of Energy reports that LED products can use at least 75% less energy than incandescent lighting and last up to 25 times longer. These figures describe LED technology broadly, not every low-profile fixture.

In field work, ceiling depth is rarely the only problem. Heat, access, and cable routing matter too. A 12-millimeter ceiling void can still be difficult. Some slim fixtures run warmer than expected when covered by insulation. That detail is easy to miss. Product testing may use ideal conditions, while real ceilings contain dust, tight wiring, and uneven surfaces. A qualified installer should verify clearance, ventilation, and junction-box access before cutting the ceiling.

Why Can Slim Lights Be Installed Under Ceiling Joists? — What Slim Lights Are and How They Differ from Standard Fixtures

Comparison Dimension Slim Lights Standard Recessed Fixtures Why It Matters Under Ceiling Joists
Typical Housing Depth Often approximately 25–50 mm, depending on the model and junction-box design. Commonly about 100–150 mm for traditional recessed housings. The shallower profile can fit in tighter ceiling cavities where a deep housing would contact a joist or require major framing changes.
Installation Position Usually mounts directly to the ceiling surface with a thin LED panel and a separate or integrated driver. Usually installs inside a ceiling cavity, with the housing positioned between joists. Surface mounting avoids cutting a large opening through the joist bay and does not depend on an unobstructed cavity.
Required Ceiling Cavity Requires only enough space for the light body, wiring, and driver or junction box. Requires sufficient depth and width for the housing, wiring, clips, and heat-management components. A compact design is more suitable for shallow ceilings, concrete ceilings, and areas where joists restrict available space.
Effect on Ceiling Joists Normally does not require notching or drilling through structural joists when installed on the ceiling surface. May require careful placement between joists; cutting or altering structural members is generally not permitted without proper approval. Installing below the joist line preserves the framing layout and reduces the risk of compromising structural components.
Cutout Requirement Often requires no large recessed cutout; some models need only a small cable entry hole. Requires a circular or square opening sized to the fixture housing. Less cutting helps avoid joists, blocking, pipes, ducts, and other concealed services.
Heat Management Uses LED technology with a heat sink or metal backplate to transfer heat away from the LEDs. Uses a larger housing and may require specific clearance from insulation and surrounding materials. Even slim LED fixtures need ventilation and installation according to their listed temperature and insulation requirements.
Insulation Compatibility Some models are rated for direct contact with insulation, while others require a defined clearance. May be insulation-contact rated or may require a separate clearance zone, depending on construction. “Slim” does not automatically mean insulation-safe. The fixture’s safety listing and installation instructions must be checked.
Typical Wattage Range Common residential sizes often use approximately 5–20 W, depending on diameter, brightness, and color temperature. Often uses approximately 8–30 W or more, depending on the lamp or integrated LED module. Lower power can reduce heat production and energy use, although electrical and thermal requirements still apply.
Common Light Output Frequently available from roughly 400 to 2,000 lumens for residential ceiling applications. Often available across a similar or broader range, depending on lamp type and fixture size. Brightness should be selected by lumens and room function rather than by wattage alone.
Ceiling Appearance Produces a low-profile, nearly flush appearance with a small visible trim or diffuser. May have a deeper trim, visible aperture, adjustable gimbal, or decorative housing. The thin profile is useful where a clean ceiling line is desired or where a deeper fixture would be visually intrusive.
Suitable Ceiling Types Suitable for many drywall, plaster, wood, concrete, and other solid ceiling surfaces when the mounting method is appropriate. Best suited to framed ceilings with adequate cavity depth and clear space between joists. Slim surface-mounted designs offer more flexibility in rooms with exposed beams, shallow framing, or solid structural ceilings.
Wiring and Junction Box May use a remote driver or an integrated junction box that must remain accessible as required by local electrical rules. Usually contains wiring within the fixture housing or an accessible junction box connected to the recessed unit. The driver and junction box must not be buried where inspection, maintenance, or replacement is impossible.
Dimming Capability Many models support dimming, but compatibility depends on the driver, dimmer, and wiring system. May support dimming through a compatible lamp, module, or fixture driver. Check the manufacturer’s dimmer compatibility information before connecting multiple fixtures to one control.
Moisture Protection Wet-location or damp-location ratings are available for suitable models, but they are not universal. Ratings also vary by fixture and installation location. Bathrooms, covered outdoor areas, and other damp spaces require a fixture with the correct location rating.
Main Installation Limitation Must be firmly attached to the ceiling substrate, with sufficient room for safe wiring and heat dissipation. Must fit between joists and comply with housing, insulation, clearance, and electrical requirements. A slim fixture simplifies space constraints but does not remove the need for code-compliant installation and proper support.

How Ceiling Joists Affect Lighting Installation

Ceiling joists affect lighting installation because they control available space, wiring routes, and structural safety. Slim lights can sit beneath joists when their shallow housings need little ceiling depth. They avoid cutting large openings through structural timber. That matters. A joist is not just an obstacle; it supports the ceiling and often carries loads above.

During installation, I check the joist direction with a stud finder and confirm the mounting location from both sides. The light should not press against timber, insulation, or hidden cables. I also measure the housing depth before drilling. A few millimetres can change the installation completely.

Surface-mounted slim lights usually work well beneath joists because they require limited cavity space. Recessed models may still need clearance, ventilation, and a suitable junction box.

Wiring must follow the safest available route. Electricians may run cable beside a joist, through approved openings, or within an accessible ceiling void. They should never weaken a joist by drilling carelessly. Local electrical rules also influence spacing, heat protection, and access requirements.

I once assumed a thin fitting would solve every clearance problem. It did not. The ceiling cavity contained insulation and an unexpected cable, so the position had to move. Careful inspection prevents rushed decisions and protects both the lighting system and the ceiling structure.

Why Slim Lights Fit Beneath Ceiling Joists

Slim lights fit beneath ceiling joists because their housings are much shallower than traditional recessed fixtures.

Instead of needing a deep ceiling cavity, they use a thin LED panel and a separate driver box. The panel can sit close to the ceiling surface, while the driver fits beside a joist or inside a small available space. This design helps when solid timber, pipes, or ductwork limit the open ceiling area.

I have seen this advantage during ceiling renovations. A conventional fixture often meets a joist and forces a new location. A slim light usually needs only a carefully measured opening and adequate clearance around its electrical components. Still, “slim” does not mean “install anywhere.” The installer must check joist positions, insulation contact, heat control, wiring access, and the ceiling material. Local electrical rules may also require specific clearance and junction-box arrangements.

Measure twice.

The light should remain flat and secure, without pressing against framing. A poorly positioned driver can create noise, heat, or future maintenance problems. In my experience, the best results come from marking every joist before cutting. It is tempting to assume a shallow fixture solves all layout issues, but that assumption can fail in older homes. A qualified electrician can confirm the structure and connections before installation, especially where insulation or multiple cables are present.

Key Clearance and Safety Requirements

Why Can Slim Lights Be Installed Under Ceiling Joists?

Slim lights can fit beneath ceiling joists because their housings are much shallower than traditional recessed fixtures. This design reduces the need for deep ceiling cavities. However, slim does not automatically mean safe for every location. The fixture must match the ceiling construction, wiring method, and installation instructions.

Clearance is the key issue. Keep the light away from exposed wood, insulation, and other combustible materials unless it is specifically rated for contact. Some fixtures require space around the driver or junction box for heat to escape. Never cover these parts with insulation. Heat can build silently above a finished ceiling.

Check the fixture’s thermal rating before cutting the opening. An IC-rated model may allow insulation contact, while another model may require a gap. The required distance can vary, so guessing is risky. Local electrical rules may also require approved boxes, grounding, and circuit protection. A qualified electrician should verify these details.

A practical check is simple. Look above the ceiling when possible. Confirm that no joist, pipe, duct, or insulation blocks the installation area. Measure twice. Cut once.

A common mistake is focusing only on the light’s thin profile. The driver, connectors, and surrounding heat space also matter. Even careful installers can overlook a crowded ceiling cavity. When access is limited, inspection from the attic can prevent damaged wiring and costly repairs.

Step-by-Step Installation Beneath a Ceiling Joist

Why Can Slim Lights Be Installed Under Ceiling Joists?

Slim lights use a shallow housing, so they need less ceiling depth than traditional recessed fixtures. This allows installation directly beneath a ceiling joist without cutting or weakening the framing. The joist still supports the ceiling above. However, the light must be rated for the intended ceiling location and temperature conditions.

Turn off the circuit breaker before measuring the work area. Mark each light position beneath the joist, keeping spacing even and avoiding existing pipes or cables. Use a stud finder, inspection opening, or accessible attic space to check the route. Measure twice. My first layout looked balanced, but one light landed too close to a duct.

Attach the mounting plate or support clips to the joist using suitable screws. Connect the wiring inside an approved electrical box, following local electrical requirements. Keep wire connections secure and protected. Then fit the slim light beneath the joist, ensuring the trim sits flat against the ceiling surface. Restore power and test each fixture. A slight gap may appear if the ceiling is uneven; correcting that detail improves both safety and appearance. When working around uncertain wiring, stop and ask a qualified electrician rather than guessing.

FAQS

How do ceiling joists affect lighting installation?

Joists limit available space, wiring routes, and mounting positions. They also support the ceiling above.

Can slim lights be installed beneath a ceiling joist?

Yes, shallow housings can fit beneath joists with little ceiling depth. They avoid large cuts through structural timber.

Why should I check the joist direction?

Joist direction helps identify safer mounting points and wiring routes. Use a stud finder and inspect from both sides.

What should I check before drilling?

Measure housing depth and inspect for insulation, pipes, ducts, and hidden cables. A few millimetres can change everything.

Do recessed lights need more clearance?

Usually, yes. Recessed models may need cavity space, ventilation, heat protection, and an approved junction box.

How should wiring pass around a ceiling joist?

Wiring may run beside a joist or through approved openings. Never drill carelessly into structural timber.

What is a practical installation sequence?

Turn off the breaker, mark even positions, inspect the route, and attach suitable mounting hardware. Connect wires inside an approved box, then test the light.

What if the ceiling contains unexpected wiring?

Stop immediately and avoid guessing. Ask a qualified electrician to inspect the area safely.

Can a thin light solve every clearance problem?

No. I once assumed it would, but insulation and an unexpected cable forced a layout change.

What should I do if the light trim has a small gap?

Check whether the ceiling is uneven and adjust the fitting carefully. A flat trim improves appearance and reduces movement.

Conclusion

Slim lights are compact, low-profile lighting fixtures designed to fit into spaces where traditional recessed housings may be too deep. Their shallow construction makes them especially useful in ceilings with limited cavity space, including areas affected by ceiling joists. Instead of requiring a large recessed enclosure, many slim lights use a thin LED panel and a remote junction box, allowing the visible fixture to sit close to the ceiling surface.

The question “can slim lights be installed directly under a ceiling joist” depends on the fixture design, installation method, and local electrical requirements. In many cases, a slim light can be positioned beneath a joist because it does not need to occupy the joist cavity, but the installer must still maintain the manufacturer’s required clearances and avoid damaging the structural member. Before installation, power should be switched off, the location measured carefully, and the ceiling checked for wiring or plumbing. The junction box must remain accessible when required, connections should be properly secured, and the fixture should be rated for the ceiling conditions, including insulation and heat exposure.

Ethan

Ethan

Ethan is a seasoned marketing professional with a deep expertise in our company's innovative product line. With a passion for sharing knowledge and insights, he takes the lead in regularly updating our corporate blog, where he explores industry trends, product features, and effective marketing......